When I was asked by my step-daughter if I would make her wedding cake, my first reaction was to be flattered that she thought me capable of providing the kind of creation that I knew would have to be pretty damn near perfect and very, very beautiful. Of course I said yes, but then the panic set in. I’d never made anything as large and important as a wedding cake and my icing skills were practically non-existent. Determined to find a cake design that was achievable and stunning to look at, I set to work. A few internet searches for recipe ideas revealed that there was a mountain of information to wade through and the thousands of wonderful creations on Pinterest nearly made me weep with envy knowing I could never achieve such spectacular results.
Discussions about what sort of cake the couple wanted ended up with us deciding on a fruit cake for the bottom tier and a light lemon sponge for the top two tiers. Who better to turn to for a celebration cake recipe than Mary Berry. In her Ultimate Cake Book she lays out all the different cake sizes and the ingredients in an easy to follow table, and as it’s an “all in one” method it was simplicity itself to make. With that done, fed with a slug of brandy and stored away in a cool place for a few months, it was on to testing the lemon sponge recipes.
The Crunchy Top Lemon Cake recipe by Mary Berry is a frequent bake in our house. It’s moist and full of sticky lemon sweetness – irresistible ! However, too soft for a wedding cake, it would never support the icing. I found what I was looking for, along with a design idea, on the BBC Good Food website with the Zingy Lemon wedding cake by Jane Hornby. You’ll find three simple wedding cake recipes there, something to suit all tastes.
The Simple Elegance Wedding Cake design was just what I was looking for for my step-daughter’s Cornish country wedding. With the lower tiers already prepared and stored away, that just left the lemon sponge to bake a couple of days before. Icing a three tier cake is never simple but when you’re borrowing someone else’s kitchen expect a few nightmare moments. A few essentials to remember – get cake boxes to transport each layer in safety and take a bit of spare icing to smooth out any wrinkles or for last minute repairs should there be any damage.
Having made it to the venue, cakes intact, the final touches could be made. The beautiful white hydrangeas and gypsophyla had arrived from the florist and I just needed some quiet time to make the tiers and decorate it. The simplicity of the white icing and flowers matched the occasion perfectly.
This time of year, wander the local hedgerows and lanes around here with a carrier bag and you could bring home a bountiful supply of free food. My absolute favourite, for two main reasons, is walnuts. First reason is they are free. Second reason is they taste amazing.
Walnut Pesto
With a big bowlful of walnuts on the kitchen counter it’s hard to resist using lots straight away in recipes like Spiced Apple Cake with Walnuts or Walnut Bread ( easy in the breadmaker and great with another seasonal favourite Potimarron and Leek Velouté ). If kept dry and away from the sun, walnuts will last for ages so we fill our pockets every time we go for a walk and make sure we squirrel away a good stash. When the walnuts started to fall to the ground this year, my step-daughter happened to be staying with us and suggested we make pesto. One jar of pesto will keep in the fridge for several days and will be OK if you keep the surface covered with olive oil though it might go a bit brown. You could also freeze small quantities for adding to pasta for example. Half of our first batch was stirred into tagliatelle, the second half was spread onto fresh whiting and baked (called merlan in France, it’s a reasonably priced fish similar to cod or haddock), served with salted potato wedges and fresh salad. You could also spread it on bruschetta, dollop some in your soup, make a toasted sandwich, stir some into mashed potato, or put it on a pizza.
So here it is, the ever so simple but very impressive Walnut Pesto.
Ingredients for Walnut Pesto
You’ll need a blender or stick-blender to make this, and if you want to store it, a sterilised jar with an air-tight lid. None of the ingredients are measured exactly, which is a good excuse to keep tasting it to get the balance and seasoning to your taste.
Ingredients
A few handfuls of fresh basil leaves
Walnuts2 cloves garlic
Olive oil
Lemon juice
Sea salt
Ground black pepper
Parmesan cheese, grated
Blend the ingredients in a blender or with a stick blender
Put all the ingredients in the blender and whizz to a pulp, adding more oil if necessary and seasoning to taste. Use straight away or seal in a jar and refridgerate.
Spiced Apple Cake with Walnuts is a delicious moist cake that can be served while still warm or stored for several days in an airtight container – if it lasts that long. It’s also a good way to use up some seasonal produce, and freezes well. I’m posting the recipe in my next post.
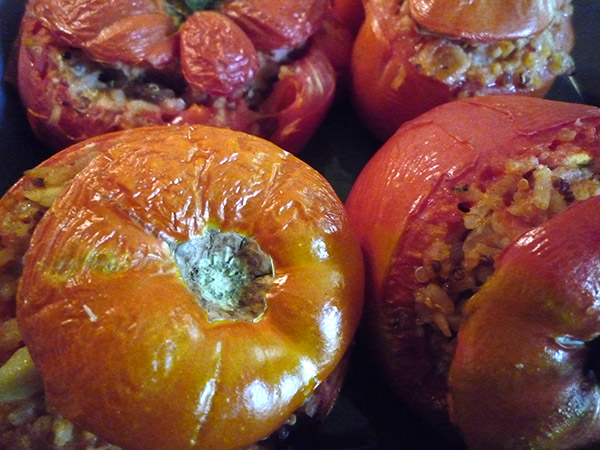
As the summer harvest of tomatoes threatens to overwhelm you, Stuffed Tomatoes are a great supper idea using storecupboard ingredients.
Stuffed tomatoes are a great way to use up some of your summer harvest.
It’s high summer and the vegetable garden is in full production. The tomato plants are heavily laden with fruit and with every sunny day that passes the pile of tomatoes in the bowl on the kitchen counter grows ever higher. You’ll be hard pushed to eat them all in salad so see how to use tomatoes in various sauces or serve as a delicious Tomato and Red Lentil soup in my previous posts. For a delicious meal idea, stuffed tomatoes are really satisfying and tasty. They take a little time to prepare but you can make more than you need and they will safely store in the fridge for another time.
For this recipe you’ll need some of the large beef tomatoes (coeur de boeuf in France) which are ideal because they have few seeds and make a good sized portion when stuffed. For a good filling you need to create flavours that will pack a punch. You can use fresh herbs or spices, dried fruit and chopped nuts, any rice or grain, or breadcrumbs, then add some protein in the form of meat, tofu or cheese, either feta, mozzarella or a strong cheddar. I combined some brown rice with quinoa to make a Moroccan style filling using cinnamon, dried fruit and cashew nuts with some cheddar cheese. Cous cous would be more appropriate if you have some.
Ingredients
4 large tomatoes
120g rice or grains (approx. 30g per large tomato), cooked
olive oil
1 onion, finely chopped
1 large clove garlic, crushed
1/2 tspn cinnamon
roughly chop a handful each of cashew nuts, sultanas, dried apricots
fresh mint, chopped
70g strong cheddar cheese, grated
salt & pepper
Start by cutting off the tops of the tomatoes and scooping out the flesh. Leave the edges quite thick otherwise the tomato will collapse in the oven. Put the tops to one side and the flesh in a seperate bowl, you’ll use this as part of the filling. To get rid of a lot of the moisture inside the tomatoes, sprinkle with a little salt then turn upside down onto a plate with a piece of kitchen towel on it and leave while you make the filling.
You can add a variety of ingredients to the rice and tomato mixture including fresh herbs, dried fruit, nuts and cheese.
Heat the oven to 180°C. Cook the rice or grain according to the instructions. In a little olive oil, fry the onion and garlic. When the onion is soft, add the tomato flesh, simmer, stirring frequently to prevent it sticking, until the mixture has reduced to a pulp. Add the cinnamon then stir in the rice and all the dry ingredients. Season with salt and pepper to taste then off the heat, add the cheese and mix thoroughly.
Stuffed Tomatoes, an tasty summer meal.
Take an ovenproof dish and brush the base with a little olive oil. Place the tomatoes in the dish and spoon in the filling making sure it is pushed in well leaving no space. Any left over filling can be served cold along with a plate of fresh salad and grated vegetables. Replace the tomato lids to prevent the filling from drying on the top. If you prefer, you can cover with some tin foil instead. Place in the oven for about 30 minutes or until the tomatoes are tender and the skins are slightly wrinkled. Serve hot with some green salad. A little mashed potato with olive oil would be lovely.
Unseasonal cold and continuous rain has meant hardly any time spent in the garden this month. It’s depressing for someone who needs the sun to shine on her shoulders every day. Looking on the bright side, there’s more time to be creative indoors and there’s always things to do in the kitchen. First on the list to do yesterday was my weekly batch of home-made yoghurt (which took a full 8 hours to set without some sun to speed up the process). Then I started preparations for some fruit buns for the freezer. They’re easy to take out individually and microwave for 30 seconds to believe they had just come fresh out the oven.
More of the buns later but while the dough was rising, I made Mary Berry’s Crunchy Top Lemon Cake. It’s such a simple recipe made with a few, relatively inexpensive ingredients but the result is a rich tasting and moist cake that would grace any tea table and impresses all those who eat it. When you take the cake out of the oven, spoon over a syrup made from the juice of a lemon and some sugar and let the cake absorb it while cooling. This cake is absolutely delicious, probably the best Lemon Cake I’ve made and best served (in my opinion) still ever so slightly warm with a huge mug of Earl Grey tea. Now back to the buns…
Smarties Brioche, recipe by The Hairy Biker’s
I’ve been making variations on a brioche recipe and some very successful Hot Cross Buns I made at Easter which turned out to be really soft and tasty. Since I got my KMixx mixer, I’ve been adapting recipes, making them all-in-one and then leaving the dough hook attachment to do all the hard work. It’s sometimes difficult to know when the dough has been kneaded sufficiently but Paul Hollywood (of Great British Bake-Off fame) in his recent series on bread, gave out a very useful tip. The dough is ready when you can pull it and it’s elastic enough to stretch without pulling apart. This method really works, try it.
I add dried fruit, a mixture of what I have in the kitchen – at the moment I have some lovely large dried cranberries which go well with raisins and currants but you could just keep to currants or try adding in some glacé cherries or mixed peel. I also find that some lemon zest adds a nice flavour but this isn’t essential.
Normally, I divide the dough in half once it’s risen and make half into ordinary buns, and half into Chelsea Bun style rounds, adding fillings like cinnamon with butter and brown sugar, chocolate chips or mixed chopped nuts. Smarties (or M&M’s) are good fun and give a satisfying crunch. Yesterday, I wanted to use up a pack of marzipan I’d had in the cupboard for a long time (past it’s best before date but who cares?) We are both crazy about marzipan and the idea of hot fruit buns with almond paste melting through the centre had us salivating at the thought.
So, to the recipe then, which is an easy all-in-one for a mixer with a dough-hook.
Ingredients
625g strong white flour1tsp salt
45g unsalted butter, grate into the bowl if it’s fridge cold
85g sugar
1 lemon, zest only (optional)
1 sachet fast action yeast
1 large egg
275ml tepid milk
150g mixed dried fruit
For the filling
100g ready to use marzipan
or 2 tsp cinnamon, 40g soft butter, 40g demerara sugar
or 1/2 tubes Smarties or a packet of M&M’s
or a filling of your choice
If you want to glaze the top of the buns, use 1tbsp of golden syrup, gently heated, then spread over the buns while still hot.
Put the flour, salt, butter, sugar, lemon zest if using, yeast and the egg into your mixer bowl. Using the dough hook attachment on the minimum speed, mix the ingredients then very slowly pour in the milk. Once a dough is formed, turn up the speed slightly and knead for 5-10 minutes. You can add the mixed dried fruit half way through and continue mixing. The dough is ready when it doesn’t break when you pull it apart, it should be elastic and soft.
The dough is ready when it’s elastic and soft.
When you are satisfied that it’s ready, remove the bowl, cover with some cling and leave to rise. It’s ready when it’s doubled in size (it will take several hours in a cold kitchen).
Lightly grease a large baking sheet with butter. On a lightly floured worktop, knock back the dough and make a large ball. At this point I divide it into two and make half into buns. Divide the dough into equal size portions, and roll into smooth buns – you should get 8 large buns from half the dough. Place them well apart on the baking sheet, cover with some greased cling film or a clean teatowel and leave to rise.
For the Chelsea style buns, grease a baking tin with butter. Roll out the other half of the dough into a large rectangle. Now you can spread on your chosen filling. If you want to try the marzipan filling, line the base of your tin with greaseproof paper. From my experience if you don’t line it, the marzipan will stick to the bottom and make it difficult to get the buns out. Roll out the paste as thinly as you can and cut it into a rectangle slightly smaller than the dough. Starting from the long edge, roll the dough tightly like a Swiss Roll with the filling inside.
Place slices into a greased and lined baking tin
It’s quite robust, you can press quite hard making sure it’s all tightly rolled. Then using a sharp knife, divide the roll into equal size slices, you should get 8-10 pieces. Place the pieces evenly over the baking tin leaving space between them for the dough to spread and rise. Cover with some cling film and set aside to rise.
Once the dough has risen and the slices have doubled in size and joined up in the tin, heat the oven to 220°C. Bake for about 10 minutes – the buns will be done first – take them out as soon as they are evenly browned all over. Glaze the buns while they are still hot then put them on a wire rack to cool. The Chelsea style buns will take a few minutes longer to cook and are done when they are nicely browned and firm to the touch. Don’t be tempted to overcook them because of the filling – they are better served soft and moist. Leave these in the tin to cool slightly before turning out onto a cooling rack and removing the greaseproof paper. They are delicious served warm.
Fruit buns with marzipan, fresh out the oven.Hot Cross Buns
If you want to make the classic Hot Cross Buns, follow the same recipe but add 2tsp mixed spice with the lemon zest. Make a flour and water paste and using a piping bag, make a cross on each bun before you put them in the oven. Glaze with warm golden syrup and leave to cool.
I was only turned on to the delights of a ripe pear a few years ago in a late summer market in Sully-sur-Loire. It was the last few weeks of researching a guide to the Loire Valley. We’d just visited the wine region of Sancerre as grape pickers were starting the harvest. Bending double between the vines, snatches of their lively conversation carried toward us on a light autumnal breeze. After exploring the old town and tasting some of the local goat’s cheese, we continued our journey following the Loire downstream and ended up in Sully where we found a small hotel to stay the night. Awoken by what seemed an inordinate amount of traffic for such a sleepy looking town, I opened the shutters the following morning and there was the local market in full swing. The centre of the town was completely packed with stalls and vans, overflowing with the fresh local produce we’d come to expect on our trips to the Loire. Now though, there was the wonderful smell of ripe fruit on the air. Apples – green, red, yellow, streaky, russety and rosy with names that had become very familiar like Reine de Reinette (the classic apple for Tarte Tatin), and others that were a revelation. And then there were pears. Long, short, stout or skinny, dimpled and smooth, green and pink, speckled and shiny, the delicious peary perfume was overwhelming.
Pears are now a regular part of my dessert repertoire, a recent favourite being Hugh Fearnley-Whitingstall’s Pear and Almond Pudding Cake (River Cottage 2009) which is great for an indulgent pudding among friends. Then the other week, I was watching The Hairy Biker’s Best of British, and there was the pear again. Combined with my favourite, the almond again, but this time with a tempting drizzle of dark chocolate melted into the filling. I couldn’t wait to try it.
I didn’t follow their recipe but I made a basic frangipane with pears, chocolate and flaked almonds.
Ingredients
Packet of all butter puff pastry (feuilleté) or make you own110g margarine
110g caster sugar
2 eggs lightly beaten
110g ground almonds
a few drops of almond flavouring (optional)
40g dark chocolate
a sprinkle of flaked almonds to decorate
2 ripe pears (I used French Conference pears)
Heat the oven to around 200ºC. Line an 8″ flan with your pastry but don’t trim the edges yet. Melt the chocolate in a bowl over a saucepan of boiling water on a low heat. You can safely let this happen while you make the filling. In a bowl, beat the margarine and sugar until well combined and add the eggs a little at a time. If the mixture starts to curdle add a little of the ground almond or a spoonful of flour to stop this happening, then continue adding the eggs. Stir in the ground almonds and add a few drops of almond essence if you like a stronger almond flavour. Peel and quarter the pears, removing the centre pips and core. Now you can assemble the tart. Spoon in the almond filling and spread evenly. Arrange the pear quarters in a circle, fat ends to the outer edge. Now drizzle the melted chocolate randomly over the top and finally, sprinkle with the flaked almonds. Trim the edges of the pastry if you like a neat edge or you can roll it over for a puffed, more rustic appearance. Place the flan in the oven for about thirty minutes until it’s golden brown on top and firm to the touch.
This flan is best served warm with a dollop of crème fraiche on the side.
I’ve been experimenting to produce the ultimate home-made veggie burger. If you haven’t got an instant burger mix – I prefer the Granose Meat-free Burger mix, then there are millions of ideas out there to make your own using lentils, kidney beans (in fact almost any kind of bean), chick peas, vegetables and so on. However, they often fall apart while cooking, and most disappointingly in my view, have a soft texture with no “bite” that is probably what I yearn for most without actually eating a meat burger. Quorn products can provide a healthy alternative to meat and as I can get Quorn mince , I set to work to create my perfect veggie-burger.
This recipe is infinitely variable and still somewhat experimental but I’ve had some great results so far. It makes approximately 8 burgers.
Ingredients:
1 onion, finely chopped
½ red pepper, finely chopped
100g Quorn mince, unfrozen
1 tspn tomato purée
1 Weetabix biscuit, scrunched into crumbs (or use a quantity of bread crumbs)
1 egg, beaten
salt & pepper
½ tspn chilli powder, or to taste
½ tablespoon Tahini paste
Vegetable oil
In a frying pan, heat a small amount of vegetable oil and cook the onions and red pepper until they’re soft. Add the Quorn mix and stir for 30 seconds or so to combine. Remove the pan from the heat and transfer the onion and Quorn mixture into a large bowl. Add the seasoning, Tahini, tomato purée, egg and Weetabix crumbs.
The chilli gives the burgers a bit of a taste kick and I’ve found they need a bit more than I would normally use to actually create a good flavour but it’s optional if you don’t like it. You could try harissa instead of tomato purée, soya sauce or Worcestershire sauce to get some flavour into the burgers.
Normal burger recipes use breadcrumbs but I’ve used Weetabix as it has the same binding effect and is readily available in my store cupboard. Using your hand or a wooden spoon, thoroughly mix all the ingredients together so that if you press it, it stays together.
Use a pastry cutter or mould to shape the burgers. I have to say that the onion was not cut finely enough in these first burgers.
Lay out a sheet of cling and use a burger mould or an upside-down pastry cutter to shape your burgers. It is best not to cook them straight away but either chill them in the fridge for a couple of hours or if you are short of time, pop them in the freezer until they’re firm. The uncooked burgers freeze well (do not thaw and re-freeze frozen Quorn) and they can be cooked straight from the freezer. They’ll need about 5 minutes each side to heat through and turn a golden brown colour. I usually top them with a slice of burger cheese, place them under the grill for a couple of minutes to melt the cheese then serve in home-made burger buns (see below) with salad, pickles and tomato sauce.
My absolute favourite bun recipe came to me from the Inquiring Chef, an American expat living in Bangkok. She in turn got it from the New York Times and now I’m passing her recipe on to you.
Kneading the brioche bun dough – you’ll need a dough cutter.
I can honestly say that once tasted, you’ll always be disappointed by every other home-made bun, they are that good. These Light Brioche Buns are quite a challenge the first time you make them as the dough is incredibly sticky but you mustn’t add flour – persevere and reap the rewards. Slice almost through the bun so they are ready to use and store in the freezer until you need them, they don’t take long to thaw or you can defrost them in the microwave in seconds.
Crêpes (or savoury galettes) are so adaptable – they make a satisfying meal and you can ring the changes on the fillings according to what you have in the fridge or the garden. One of the best restaurant crêpes we’ve had was on a visit to Nantes while we were working on a guide to the Loire Valley for Footprint Books. The Crêperie Heb-Ken (5 rue de Guérande, Nantes) is tucked down a side street but it’s hard to miss with it’s bright facade and jolly pavement tables. Inside it was packed with lunchtime diners, a sure sign that the food is good. The extensive menu took some time to read and then it took even longer to decide what to have but when the food arrived, it was absolutely delicious. After this I was inspired to purchase my own crêpe pan and start experimenting. While they might not be authentic, the crêpes I’ve arrived at are tasty, nutritious and filling – what more could you ask?
The secret to a good crêpe lies in using buckwheat flour (sarassin or blé noir in France) which isn’t actually flour at all, but the milled seed of a plant that’s related to rhubarb and sorrel. It’s gluten-free, a great source of protein and minerals and contains rutin and Vitamin E which are both powerful antioxidents. If you use 100% buckwheat, you’ll need to let the crêpe mixture stand for at least 2 hours, but mix it half and half with plain flour and it’s possible to use it more or less straight away although it improves with standing.
Crêpe pans are available in supermarkets here in France and cost from around €12 though you can pay a lot more. The best little gadget if you can find it is the spreader – a wooden dowel that spreads the mixture evenly around the pan which is often sold together with the pan or you can find them in kitchen shops for a couple of euros. It’s indispensable!
Crêpe mixture
125g buckwheat flour
125g plain flour
2 eggs
1 tbspn vegetable oil
½ tspn salt
500ml water
knob of butter
Put the flours in a large bowl and make a well in the centre. Beat the eggs and pour into the centre along with the oil and salt. Use a whisk to combine these and continue, adding a little of the water at a time, until you have removed the lumps and incorporated all the water. Cover and leave to stand while you prepare your fillings.
Spread the mixture evenly round the pan with a spreader. When the first side is browned, the crêpe will lift easily to turn it over with a spatula.
Favourite Fillings
Grated Cheese
The simplest filling is grated cheese. I use a gruyère such as Comte which has a nice nutty flavour and combines well with the flavour of the crêpe. Other cheese such as a strong cheddar would be best combined with other ingredients such as mushrooms or cooked fresh tomatoes (see below).
Mushroom and potato filling with Comte cheese
Mushrooms
Simply slice mushrooms and fry gently in butter. Season well with salt and pepper. Best combined with cheese and/or ham in a crêpe but if you have plenty, they’re good on their own with a spoonful of crème fraîche. If you have left-over cold potatoes, chop them into cubes into the mushrooms making sure they’re heated through before serving.
Spinach
Cooked spinach leaves seasoned with salt and pepper combine well with mushrooms and créme fraîche. A little Comte cheese sprinkled on top gives it a sharper flavour.
Tomatoes
We thought this wouldn’t work but we tried it at Crêperie Heb-Ken and the flavours are amazing. Using fresh tomatoes, skin and chop them (removing seeds if you prefer) and add to some hot olive oil with a crushed clove of garlic in a shallow pan. Cook them until the flesh breaks down and the liquid is reduced. Season well with salt and pepper and serve in a crêpe with cheese or ham.
When the filling is hot and the cheese starts to melt, the crêpe is ready to serve.
Here’s a recipe for a really tasty nut roast that is a little different and a little bit more luxurious than a basic lentil loaf – perfect for a Sunday roast or supper for friends.
I found the recipe a month or two ago in a collection of vegetarian recipes published in the mid-90’s. It’s so delicious served hot with a mushroom sauce, we’ve eaten it several times since. I find it will keep for a few days wrapped in foil or cling film in the fridge and reheats nicely in the microwave.
Savoury Roasted Almond and Sesame Seed Loaf
2 tbspn olive oil
1 small onion, finely chopped
60g risotto rice
300ml vegetable stock
1 large carrot, grated
1 large leek, chopped finely
2-3 tsp sesame seeds, toasted
60g chopped or flaked almonds, toasted
60g ground almonds
90g strong Cheddar cheese, grated
2 eggs, beaten
1 tsp dried mixed herbs or fresh herbs, finely chopped
salt and pepper
1. Heat the oil in a deep frying pan and gently fry the onion for 2-3 minutes. Add the rice and cook for 5 minutes, stirring now and then. Add all the stock, stir whilst bringing it to the boil then leave to simmer for 15 minutes or until the rice is tender. You might need to add a little more water.
Simmer the onion and risotto rice in the stock
2. Put another frying pan on a gentle heat and wait until it’s hot before putting the sesame seeds and almonds in to roast. Stir constantly while they brown, taking care not to let them burn.
Put all the dry ingredients into a large bowl
3. In a large bowl, put the grated carrot, leek, cheese, eggs, mixed herbs, sesame seeds, almonds and the rice and onion mixture. Season and mix well. It should be quite moist.
Stir in the risotto rice and beaten egg to make a moist mixture, season with salt and pepper.
4. Pour the mixture into a lined loaf tin, firming it down with the back of a spoon. Bake in the oven for 1 hour, temperature 180ºC, until set firm and golden on top. Leave it in the tin for about 10 minutes.
Just out the oven!
5. To make the sauce, melt the butter in a saucepan and gently fry the onion until golden brown. Add the mushrooms and cook for a further 2 minutes. Stir in the flour and cook for 1 minute before adding the stock a little at a time, stirring all the time to get rid of any lumps. Bring to the boil, make sure it’s smooth and season to taste.
6. Turn out the loaf and slice. Excellent served with roast potatoes and fresh green vegetables with the tasty mushroom sauce.
Roasted Almond and Sesame Seed Loaf served with green vegetables and a mushroom sauce.
As promised, here’s a wonderful recipe for a thick and tasty soup using a small pumpkin known as the Potimarron. The flesh is dense and flavoursome and is perfect for adding to curries, risotto, vegetable crumbles and stews because it doesn’t break up as easily as larger pumpkins and retains it’s buttery, nutty taste. When made into soup, it hardly needs any other ingredients but in this French recipe, it’s paired with leeks to give a lovely earthy and Autumnal thick soup.
Potimarron and Leek Velouté
½ potimarron or 1 small one (or substitute Butternut Squash, de-seeded and peeled)
2/3 large leeks
1 small onion
25g butter
Vegetable stock
Salt & Pepper
Start by preparing the potimarron. If you have a steamer, place the pumpkin in the steam for about 5 minutes to soften the skin- it makes it much easier to peel. Meanwhile, wash and chop the leeks and an onion.
Heat a large saucepan, melt the butter, then gently frythe leeks and onion until they are softened but not browned. Peel then chop the potimarron into large chunks and add them to the leeks. Stir in enough stock to cover the vegetables, bring to the boil, cover and simmer for about 20 minutes or until the potimarron pieces are tender.
Leave to cool a little then blitz in a blender for a smooth velouté. If it’s too thick, add a little water, season with salt and pepper to taste and reheat when you’re ready to serve. This soup tastes much better if it’s left for a day or more for the flavours to develop.
Serve with a dollop of creme fraiche swirled through the soup for an extra creamy taste.
I grew Butternut Squash for the first time this year. Just one plant, but it was so successful I wish I’d grown more. Up until now I’d relied on the wonderfully flavoursome potimarron – a small, densely fleshed pumpkin with a super nutty flavour and one of the most popular here in western France. You can roast it, make great soup (goes especially well with leeks and I’ll give you the recipe soon), risotto and curries. But I’ve found that Butternut Squash is equally as adaptable and there’s still plenty of dishes I want to try.
Potimarron (left) and Butternut Squash
I love to cook on a dull, damp Saturday like today. First on the agenda was something tasty for lunch. I started by roasting half a Butternut Squash I had left over from making a curry earlier in the week. The cut halves keep very well wrapped in cling film in the bottom of the fridge. The plan was to make Roast Butternut Squash soup and some Soda Bread.
You need to start preparing this from scratch about an hour and a half in advance but you could easily roast the squash ahead of time or the day before and leave in the fridge until you’re ready. I find that if I roast both halves, we can enjoy an evening meal with one half such as stuffed Butternut Squash with blue cheese and walnuts, then make a soup a day or two later with the remaining half.
Roast Butternut Squash soup served with Soda Bread
Roast Butternut Squash Soup (serves 2)
1 half Butternut Squash
1 clove garlic
olive oil
1 onion, chopped
½ pint vegetable stock
salt & pepper
pinch fresh nutmeg
crème fraiche to serve (optional)
Begin by scooping out the seeds from the squash. Place the halved squash in an ovenproof dish, place a peeled garlic clove in the depression where the seeds were and pour in a good glug of olive oil. Season with salt and pepper then place in an oven (preheated to 180°C) until the flesh is soft when you insert a knife – about 45 minutes. When cooked, leave to one side to cool a little while you soften a chopped onion in some olive oil in a large saucepan. Remove the flesh from the skin of the squash with a spoon and add it to the onion, not forgetting any of the lovely seasoned olive oil and the roast garlic clove. At this stage I add a pinch of fresh nutmeg but you could experiment with different flavours – a finely chopped fresh chilli added to the onion will give the soup a nice kick. Add the stock (adjust the quantity if necessary) and bring to the boil, then simmer for 5-10 minutes.
Whizz the soup into a smooth consistency in a blender or with a stick blender like me, taste and season if necessary. Serve with a swirl of crème fraiche and some fresh bread.
Soda Bread
This is ideal when you want fresh bread quickly as it takes less than an hour from start to finish and it looks great on the table. Serve warm.
170g plain flour
170g self-raising flour
½ tspn salt
½ tspn bicarbonate of soda
½ pint buttermilk
Begin by mixing the dry ingredients in a large bowl then add the buttermilk. If you can’t get buttermilk (soured milk), just add 1-2 tablespoons of lemon juice to the milk, stir and leave to stand for 5 minutes. Add the buttermilk to the bowl and mix with a fork until it’s mostly combined then you’ll have to get your hand in there and bring it together into a soft dough. Lightly flour your work surface and just knead the dough lightly to bring it into a ball then place on a floured baking tray. Take a sharp knife and score a deep cross into the top of the dough. Bake in a hot oven (200°C) for about 30 minutes or until golden brown and sounding hollow when you tap the bottom of the loaf.
Place the loaf on a cooling rack for 10-15 minutes before serving when you can just pull it apart and spread with butter. Delicious!